How to add forms in Symfony 6
Coding (Symfony)
Adding form into Symfony has never been so easy. learn the step in this tutorial

Let’s start with a pro tip:
“There is no better way to get a job as a web developer than to show your own website”.
Especially, if you are looking to start your career as a junior developer.
This was what I was thinking when I started creating my first portfolio website years ago.
A decade has passed since I heard this advice for the first time and it has served me very well.
Since then things have changed.
In fact, I realized that I haven’t updated my website in years.
This January I decided that this has to change.
One of my year's resolutions was to create a brand new and modern website.
And I am going to show you how I am doing it in the process.
A bit of background
I have recently started a new job as a senior developer in a place that uses Symfony as its PHP Framework.
So I’ve thought why don’t make my new website using Symfony?
I’ll fulfill my goal and improve at my job at the same time.
The famous 2 birds with one stone.
Let’s start!
Create an Entity
The main feature of my website should have a blog where you can display all my content and people can learn from it.
These need to be saved into the database.
The first step when adding some records to a database is to ask ourselves what data we need to add.
A database is like a spreadsheet, each colon represents a field we can fill with data.
The way we represent these fields in code is by a class called Entity.
In my case, I want to keep the data as similar as possible to the old website so I can still use the old articles in my blog.
My current blog has a system or hierarchy with main categories and series.
I’ll start creating a CRUD system for the main category.
Here is my current table:
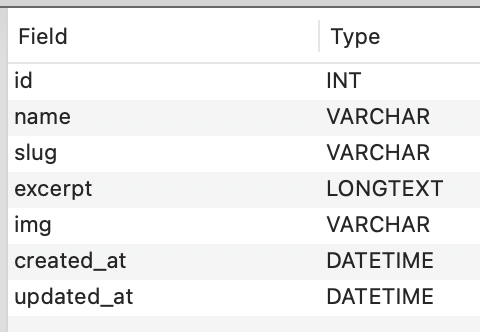
Nothing fancy, just a few fields.
This now has to be translated into an entity class
Here is the command I use:
php bin/console make:entity
You will need the maker bundle to make it work.
This command will prompt a series of questions.
I have answered them and added some validation rules foreseeing the form we are about to write.
More on this is below.
Here is the Entity model that automatically comes out:
namespace App\Entity;

use App\Repository\MainBlogCategoryRepository;
use Doctrine\DBAL\Types\Types;
use Doctrine\ORM\Mapping as ORM;
use Symfony\Component\Validator\Constraints as Assert;

#[ORM\Entity(repositoryClass: MainBlogCategoryRepository::class)]
#[ORM\Table(name: 'blogsupercat')]
class MainBlogCategory
{
    #[ORM\Id]
    #[ORM\GeneratedValue]
    #[ORM\Column]
    private ?int $id = null;

    #[ORM\Column(length: 255)]
    #[Assert\NotBlank]
    #[Assert\Length(
        min: 5,
        max: 255,
        minMessage: 'The name of the main Category must be at least {{ limit }} characters long',
        maxMessage: 'The name of the main Category cannot be longer than {{ limit }} characters',
    )]
    private ?string $name = null;

    #[ORM\Column(length: 255)]
    #[Assert\NotBlank]
    #[Assert\Length(
        min: 5,
        max: 255,
        minMessage: 'The slug of the main Category must be at least {{ limit }} characters long',
        maxMessage: 'The slug of the main Category cannot be longer than {{ limit }} characters',
    )]
    private ?string $slug = null;

    #[ORM\Column(type: Types::TEXT)]
    #[Assert\NotBlank]
    #[Assert\Length(
        min: 5,
        max: 500,
        minMessage: 'The excerpt of the main Category must be at least {{ limit }} characters long',
        maxMessage: 'The excerpt of the main Category cannot be longer than {{ limit }} characters',
    )]
    private ?string $excerpt = null;

    #[ORM\Column(length: 255)]
    #[Assert\NotBlank]
    private ?string $img = null;

    #[ORM\Column(type: Types::DATETIME_MUTABLE, nullable: true)]
    #[Assert\Type(\DateTime::class)]
    private ?\DateTimeInterface $created_at = null;

    #[ORM\Column(type: Types::DATETIME_MUTABLE, nullable: true)]
    #[Assert\Type(\DateTime::class)]
    private ?\DateTimeInterface $updated_at = null;

    public function getId(): ?int
    {
        return $this->id;
    }

    public function getName(): ?string
    {
        return $this->name;
    }

    public function setName(string $name): self
    {
        $this->name = $name;

        return $this;
    }

    public function getSlug(): ?string
    {
        return $this->slug;
    }

    public function setSlug(string $slug): self
    {
        $this->slug = $slug;

        return $this;
    }

    public function getExcerpt(): ?string
    {
        return $this->excerpt;
    }

    public function setExcerpt(string $excerpt): self
    {
        $this->excerpt = $excerpt;

        return $this;
    }

    public function getImg(): ?string
    {
        return $this->img;
    }

    public function setImg(string $img): self
    {
        $this->img = $img;

        return $this;
    }

    public function getCreatedAt(): ?\DateTimeInterface
    {
        return $this->created_at;
    }

    public function setCreatedAt(?\DateTimeInterface $created_at): self
    {
        $this->created_at = $created_at;

        return $this;
    }

    public function getUpdatedAt(): ?\DateTimeInterface
    {
        return $this->updated_at;
    }

    public function setUpdatedAt(?\DateTimeInterface $updated_at): self
    {
        $this->updated_at = $updated_at;

        return $this;
    }
}
amazing!
Now it is time to make the form that will send the data to be saved into the database.
Creating the form
The command to create a form is very similar to the one required to create an entity.
php bin/console make:form
This will create a MainBlogCategoryType inside the src/Form directory.
I just have to remove the created_at and update_at fields as they will be updated manually and add the save button.
namespace App\Form;

use App\Entity\MainBlogCategory;
use Symfony\Component\Form\AbstractType;
use Symfony\Component\Form\FormBuilderInterface;
use Symfony\Component\OptionsResolver\OptionsResolver;
use Symfony\Component\Form\Extension\Core\Type\SubmitType;
use Symfony\Component\Form\Extension\Core\Type\FileType;

class MainBlogCategoryType extends AbstractType
{
    public function buildForm(FormBuilderInterface $builder, array $options): void
    {
        $builder
            ->add('name')
            ->add('slug')
            ->add('excerpt')
            ->add('img', FileType::class)
            ->add('save', SubmitType::class)
        ;
    }

    public function configureOptions(OptionsResolver $resolver): void
    {
        $resolver->setDefaults([
            'data_class' => MainBlogCategory::class,
        ]);
    }
}
The form class is ready to be used!
Using the form
Little recap.
We have a MainBlogCategory entity,
It reflects the data we need to add to the database.
Also, we already have the form class.
It will be used to add the data via the front end of the application.
Now we need to connect the two classes.
We will do it via another layer that will lay in between.
The controller layer.
Symfony has a structure called the MVC pattern.
It is a pretty famous pattern, but if you haven’t heard of it yet, I have described how MVC works in detail.
Back to the controller:
class MainBlogCategoryCreateController extends AbstractController
{
    public function __construct(public MainBlogCategoryCreateService $service)
    {
    }

    #[Route('/admin/blog/supercategory/create', name: 'app_blog_super_category_create')]
    public function __invoke(Request $request, ManagerRegistry $doctrine): Response
    {
        $form = $this->createForm(MainBlogCategoryType::class, new MainBlogCategory());
        $form->handleRequest($request);

        if ($form->isSubmitted() && $form->isValid()) {
            $this->service->saveData($form, $doctrine);
            return $this->redirectToRoute('app_blog_super_category');
        }

        return $this->render('admin/blog/supercategory/create.html.twig', [
            'controller_name' => 'MainBlogCategoryController',
            'form' => $form,
        ]);
    }
}
What the controller does is pretty straightforward.
The method is invoked when the route is hit.
It creates the form and renders the view.
If the form has been submitted, it calls for a service I created that is in charge of saving the data.
I would have preferred to make an even slimmer version of the controller.
Unfortunately methods like createform() and redirectToRoute() come from the extended class AbstractController.
The service has only one responsibility which is to add the timestamps and save the data coming from the form.
public function saveData(FormInterface $form, $doctrine)
    {
        $now = new \DateTime('now');

        $task = $form->getData();
        $task->setCreatedAt($now);
        $task->setUpdatedAt($now);

        $entityManager = $doctrine->getManager();
        $entityManager->persist($task);
        $entityManager->flush();
    }
Easy!
Style the form
You might have noticed that the form already works.
It accepts the incoming data and saves it to the database.
You might have also noticed that the front end of the form is very ‘simple’.
An easy way to update this and make it more user-friendly is by using Bootstrap
Bootstrap is a front-end framework that includes CSS classes and Javascript animations.
We can implement Bootstrap into Symfony, and it only takes 1 line of code.
The file that needs to be updated is config/packages/twig.yaml.
This is the line you need to add:
twig:
    form_themes: ['bootstrap_5_layout.html.twig']
Another easy fix and now our form looks beautiful.

Field’s Validation
I quickly mentioned validation above so let’s delve into it.
In Symfony, validations work differently than in other frameworks.
In fact, in this framework, they are embedded within the entity classes.
Let’s have a look at how I implement them.
To start with you need one command:
composer require symfony/validator
This will update your composer.json file and download the required packages.
Then we move into our entity class.
Let’s get one of the values, let’s say the name of our category.
What do we want?
I’d like the name to be always filled in the form.
Also, given the database constriction, I want it to be a maximum of 255 characters long.
Would be nice to set a minimum length too, 5 characters should be enough.
Here is the outcome:
use Symfony\Component\Validator\Constraints as Assert;

# More code here

#[ORM\Column(length: 255)]
#[Assert\NotBlank]
#[Assert\Length(
    min: 5,
    max: 255,
    minMessage: 'The name of the main Category must be at least {{ limit }} characters long',
    maxMessage: 'The name of the main Category cannot be longer than {{ limit }} characters',
)]
private ?string $name = null;
The component we required above enables us to use the Constraints class that we aliased Assert.
Then we just add our validation rules as PHP annotations.
You can read the full list of constraints from the Symfony documentation.
Conclusion
That’s it!
This was a quick and easy explanation of how I am adding a form to my new blog.
If you have any questions feel free to contact me or comment below.
If you want to follow along with this project and learn a ton about Symfony, subscribe to the newsletter.
Thanks for reading.