Git for PHP developers [branches]
Coding (Php 7.x)
A clear explanation with PHP examples of how GIT branches work

Parallel universe,
We all have grown up watching movies and reading fantasy books about different universes.
Some of them follow strange physics laws, there are others in which we can perform some action and get different responses that the one we would aspect.
Where would you go you could fly?
How about a parallel universe where you can become invisible?
These are all fantasy but there is one place in which you can do that.
That place is YOUR CODE!
One of the features of GIT is the possibility to work on different branches,
Think of them as parallel universes,
A branch in Git is a pointer to one of the commits. While the default branch name in Git is the master branch you can create as many branches you want.
In this episode, we’ll see how to fully exploit this feature, and make your changes in your application more secure.
The series
We have already covered the basics of GIT.
You can have a look at the previous episode of the series Git for PHP developer at the link below:
- Git for PHP developer (Installation & Configurations)
- Git for PHP developer (Manage branches)
- Git for PHP developer (Merging)
- Git for PHP developer (Sync)

Branches
If this is the first time you heard about this concept I want you to think of branches as they were universal parallels that you can visit and manipulate at your will.
Using real-life examples we can think of them in this way:
Are you late to work?
You create a parallel universe in which you can fly then as soon as you arrive at the office get back to normal life,
Don’t want to wait 2 days for that TV you order on Amazon?
Get on a universal parallel in which the delivery is just 10 minutes.
It won't make much sense at the moment but this is how these features have been added in your favourite videogame or e-commerce website.
What is a branch in git?
We have seen in the last episode that the application in your repo take account of all the editing you do to your code, these updates, work like timestamp and are called commits.
You can have as many commits as you want in your project but what if something goes wrong, or you and your colleague have to work on the same file but for adding different features.
Here is why we need a branch.
Branch (with example)
I believe the best way to explain something in code is by using an example and in this example, we are working together.
In this project, we are going to build a calculator in PHP (simple enough).
We will do it the git way.
The goal:
Create a calculator that can perform very basic operations.
First thing first, we need to create a project folder and initialize the repo.
You have seen it in the previous episode, go back if you missed it.
We have now a brand new repo with an initial commit, on our master branch.
We can verify it by typing the following command in the console:
git branch
*master
Let’s start coding:
// index.php
class Calculator
{
    public static function getSum (int $a, int $b): int
    {
        return $a + $b;
    }
}

echo Calculator::getSum(5, 2); // 7
If you don’t know what just happened my advice is to step back for a minute and read this post about the basics of PHP.
If you have followed along with let's continue.
git -am 'getSum method created'
Here we are the second commit of our project,
The master branch has been updated,
now I will create the second method getSubtraction() while you as the other contributor get to start working on getMultiplication().
// My stuff
class Calculator
{
    public static function getSum (int $a, int $b): int
    {
        return $a + $b;
    }

    public static function getDifference (int $a, int $b): int
    {
        return $a - $b;
    }
}
// Your stuff
class Calculator
{
    public static function getSum (int $a, int $b): int
    {
        return $a + $b;
    }

    public static function getProduct (int $a, int $b): int
    {
        return $a * $b;
    }
}
I am sure you can already see where is the problem here,
We both have updated the Calculator class according to our previous commit.
This resulted in writing different code in the same line, whoever will commit the last will overwrite the commit of the other.
Let’s solve this problem by creating a branch
git branch subtractionFeature
git branch multiplicationFeature
Then check if the branch has been created
git branch
*master
subtractionFeature
multiplicationFeature
If we add the file only in the specific branch accordingly we won’t have affected the master in any case.
Then we can move among the branches and see only the update required for each branch.
Another reason to use branches while working on a PHP project is to avoid inserting error into the main code.
check below!
Now we need to calculate the division,
public static function getQuotient(int $a, int $b): int
{
    return intdiv($a, $b)
}
What if I add this code to the master branch?
Can you spot the error here?
This post written by Andrew Powell-Morse can give you the right hint.
We cannot divide a number by 0.
This created problems on the runtime engine of PHP for a while.
PHP7 has introduced a brand new exception so let’s add it to our method.
public static function getQuotient(int $a, int $b)
{
    try {
        return intdiv($a, $b)
    } catch (DivisionByZeroError $e) {
        return $e->getMessage();
    }
}
If we would have created a branch before adding this commit our master would have been safe and clear from these type of errors.
Let’s say we have merged these two branches.
Also, we need to clean up our git situation here,
git branch -D subtractionFeature
git branch -D multiplicationFeature
git branch
*master
The flag -D delete the branches that we do not want to use anymore in this case we remain with the master,
Note that there is another flag available that is -d (lowercase) it is only available if we have merged the branch to master.
Checkout
We have seen that by appending a name to the git branch command you create another branch.
How about switching from one branch to another?
The way you can do that is by using the checkout command,
git checkout branchName
This will move the HEAD of your repo to the branch you indicate,
Our calculator looks alright but there are other operations we can do,
Let’s calculate the modulo now
git branch modulo
git branch
* master
modulo
git checkout modulo
We are in the modulo branch, which is a copy of the master.
...
public static function getModulus(int $a, int $b): int
{
    return $a % $b;
}
...
git commit -a -m 'modulo method added'
To sum up, I have copied the master branch into another branch called modulo, added the code I needed and commit the new code.
This is the situation at the moment
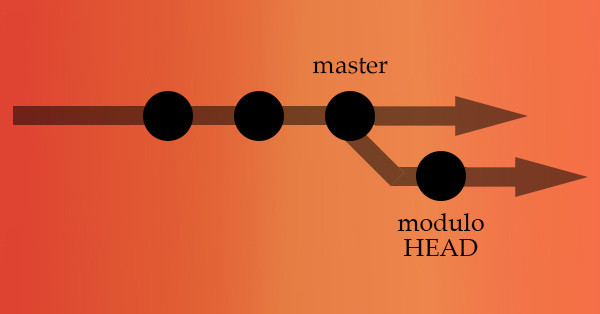
I am one step forward in my modulo branch, whereas the master is still at the same point.
In case I checkout back to master I won’t be able to see the new addition anymore.
git checkout master
I am on master now and adding this method to the repo
public static function getPercentage(int $a, int $b)
{
    return ($a/ 100) * $b;
}
git commit -am 'percentage method added'
Note that I am writing the flags differently to demonstrate that these are synonymous and do the same thing.
I am now in this situation
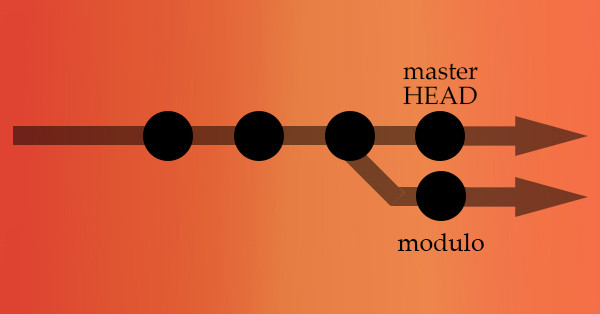
You can check the current situation of all your branches with the command.
$ git log --oneline --decorate --graph --all
* 111(HEAD, master) percentage method added
| * 112 (modulo) modulo method added
|/
There are a few really useful flags:
git checkout -b newBranchName
This command is equal to git branch newBranchName
It will create and move the head of your repo to a new branch.
If the flag is -B (with a capital letter) the new branch will be created if now exists or reset if already in the repo.
Another flag is the -m or --merge
By default,
In case we have a modification in the master branch and the branch to which you are switching checkout refuses to switch branches and maintain our updates.
If we enable this flag, a three-way merge between the current branch, our working tree, and the new branch is done, and we are going to end up in the new branch created.
Switch
The switch command was made available with the release of git version 2.23.0.
It has very similar features to the checkout command and because of that, you may wonder why to add another command to the already long list.
The fact is that checkout does a lot of different things, and as you can see in the documentation online it also has several flags that increase the number of activities that can be performed by this command.
The switch command instead is a bit more specific, it switches from a branch to another, if the command exists already.
Or if it does not exist it try to replicate origin/
In this case,
the working tree which is just a fancy way to call the working directory is updated to match the branch.
All new commits will be added to the tip of the new branch.
Eventually, using the flag -c or -C you can manually create a new branch.
Examples:
git switch master
Change the branch to master.
git switch -m modulo
You can add the -m flag to the command, which in this case will try to a three-way merge.
git switch -c squareRoot
The -c flag creates a new branch while redirect to it
Tag
Often while you create an application, you get to certain milestones.
It may be another version of an API you are working on or a breaking update to a web app.
To help with this git provides tags that mark specific release points.
We can create 2 different types of tags:
Lightweight it is similar to a branch but it doesn’t change. it points to a specific commit;
Annotated are full objects in the Git database, they have several metatags like tagger name, email, and the date they also have a message and can be signed and verified.
Lightweight Tags
This is the simplest way to create tags, all you need to do is to type.
git tag then the name of the tag.
git tag v1.0
git show v1.0
commit: ca82a6dff817ec66f44342078965412
Author: Nico Anastasio
Date: Tue Mar 17 10:55:11 2020
Annotated Tags
Annotated tags on the other side need to be a bit more explanation, it needs a few tags such as -a and -m.
git tag -a v2.0 -m "this is the second version"
The a- flag specifies that this will be an annotated tag whereas the -m is the message that will come along
git show v2.0
tag v2.0
Tagger: Nico Anastasio
Date: Thu Mar 19 18:18:12 2020 -0700

this is the second version

commit ca89a7dff257ec66f44342020202690a937845
Author: Nico Anastasio
Date: Tue Mar 17 10:55:11 2020
As you can see from the code above here is some more info you can use when verifying your tag
Listing Tags
You may have realized that for a longer project the list of tag can be very long and it would be really difficult to actually find the right tag.
The good news is that you can list and filter them.
To see all our tags we can use the git tag command:
$ git tag
v1.0
v1.5
v1.5.1
v2.0
v2.1
v2.2
In case you have more under a single version you can see them more in details with the flag -l
git tag -l "v2*"
v2.0
v2.1
v2.2
Where the * act like a special character and search for all of them.
Sharing Tags
Tags need to be explicitly pushed to a shared server after we created them.
This process is very similar to sharing a remote branch,
The command to do it is:
git push origin v3.0
Instead, in case you have created more than one tag and you want to push all of them at once this is the command you are looking for.
git push origin --tags
Checking out Tags
We have just seen how you can switch from a branch to another using the checkout command,
Guess what?
If we specify a tag instead than the name of a branch we are going to get the commit in which the repo was tagged,
Note that our this will put the repo in a detached HEAD state.
git checkout v4.0
Note: checking out 'v4.0'.
You are in 'detached HEAD' state. You can look around, make experimental changes and commit them, and you can discard any commits you make in this state without impacting any branches by performing another checkout.
If you make changes when you are in “detached HEAD” and then create a commit, the tag won’t change, but your new commit won’t belong to any branch and you won’t be able to reach it,
If you need to make changes you might want to create a branch using one of the commands we have already see above.
Postponed tag
What if you have created a repo and pushed several commits but only now you realized that one of your commits should be pinned with a tag
Git allows us to set tag to a specific commit even after we have pushed several commits afterwards
As a first thing we might want to list all the commit we have pushed so far in our project.
git log --pretty=oneline

9fceb02d0ae598e95dc970b74767f19372d61af8 Create getSum method created
0d52aaab4479697da7686c15f77a3d64d9165190 Create subtractionFeature
0b7434d86859cc7b8c3d5e1dddfed66ff742fcbc Create multiplicationFeature
6w52a271eda8725415634dd79daabbc4d9b6008e Merge newBranchName
166ae0c4d3f420721acbb115cc33848dfcc2121a Create modulo
If we want to tag a specific tag we can do that by specifying the name of the tag and selecting the id of the commit,
It does not need to be the full commit, we can do that only typing the first few letters (as long as there are no other ids that starts the same way).
git tag -a v1.5 6w52
If we check our tags we will now see this:
git tag
v1.0
v1.5
v2.0
v3.0
Deleting Tags
Lastly, you might also want to delete one or more of the tags you have just learned to create
That’s very simple:
git tag -d v1.5
Deleted tag 'v1.5' (was 6w52)
And to remove it from the remote server you do this:
git push origin --delete 6w52
Worktree
Usually, a repository consists of a main working tree and it may have a few linked working trees.
The files within a linked working tree are stored in a different directory.
The reason we have this command is that this allows us to avoid to switch between branches within the same working tree.
In case we have to work on a big feature what we would usually do is to create a new branch as we saw above.
This will set all the tools, IDE etc according to the branch.
Whereas having a separate working tree helps switch between branches without interrupting your work on the new feature.
To add a work tree you need to use the command.
git worktree add ../temp master
You can also list all the work trees you have created.
git worktree list
And clean up the working tree after you finish working with them with:
git worktree prune
To get more information about this command, have a look at Saving Time With Multiple Working Trees in Git by Ronald Klazar
log
By now you have surely understood that when you are working in a project that requires a lot of time you are going to end up with a repo with several dozens or hundreds of commits.
There may be a big chance that from time to time you want to go back as see what happened.
After all,
this is one of the reasons for having git in the first place.
One of the most basic command that let you do that is:
git log
As said this command is very basic but it is also powerful because it has plenty of flags that you can use to make it show more details.
For the full explanation and the list of all the flags available please refer to https://git-scm.com/docs/git-log
Conclusion
In this article, we have seen the basic on how to create and manage branches in your repo.
Branches are one of the fundamental parts of git,
Being able to understand how to manage them is very important for beginner and advanced web developer.
Where to go from now?
If you missed the first part of this series where to go is quite straightforward.
If instead you what to level up some PHP skills you can have a look at one of the best review of PHP 7.4 available online.