Git for PHP developers [sync]
Coding (Php 7.x)
Discover all the secret of syncing you repo to central

Synchronize changes
Many web developers, and me among them, are strongly convinced that GIT is an amazing tool that increases the quality of your life.
And I am talking about both, your private life, in fact, you get peace of mind if you are version controlling your application, and your web development life, read it, career.
It makes it easier to manage any project you are working on.
Plus having even basic knowledge of GIT can be the difference between get a job or get to send other CVs.
Trust me on that one,
I have been there!
In the last couple of weeks, we have been reading through the basics of GIT.
Today you will see how to sync different branches of your repo.
You will do that by using specific commands that are: git fetch, git pull and git push.
Git for PHP developers, the series
Git for PHP developer is a series realized for web developers that want to start using tools to increase their productivity.
This is the fourth chapter of the series.
If you missed it, you can have a look at the previous episode of the series Git for PHP developer at the link below:
- Git for PHP developer (Installation & Configurations)
- Git for PHP developer (Manage branches)
- Git for PHP developer (Merging)
- Git for PHP developer (Sync)
Git fetch
This command fetches refs from one of the other repo you have in your project.
By the way, the word refs refer to either branches or tags.
It also ‘download’ all the object that are required to complete the histories of these refs.
But, why are we talking about refs when we just want to get some external code into our working repo.
Let’s explain that with an example.
Imagine that we are working on a project and currently have two files:
They are one.php and two.php
btw, never call you PHP file one or two
One of the other contributors of this project has been tasked to create another file, you guess it, he needs to create three.php.
He has been reading this series and he knows the best practice of GIT, so he creates a new branch called ‘creating three’ and start working on that.
An issue arises and he wants our opinion on how to solve this problem
By now, we know the to check the file we need to get to the proper branch.
git checkout three
error pathspec ‘three’ did not match any file(s) known to git
Why is that? We know for sure that the other PHP developer his doing his job and the repo exists in the project but we cannot connect to it.
The reason is that we do not have any info about this brand new repo in our local machine.
To be able to work or this repo we need to fetch all the new existing refs (in this case the three repo).
To do that we need to perform the command
git fetch origin
git checkout three
The command fetch origin ‘downloads’ all the refs included in origin.
As you can see, now we were able to checkout to the new branch and start working on it.
We can also be more specific and get only the ref we want to use
In that case, the command would have been.
git fetch origin three:localThree
What this command does is to fetch the branch three from the remote repository and update (or create) the branch localThree in our local repository.
Easy right?
Now let's move onto something a bit more challenging
Git pull
Like the git fetch command that we just saw, git pull is also used to download the content of a specific repository.
There are a few important differences though, and we are going to discover them here.
git pull is the mix of two commands.
The first one is git fetch, and the second is git merge.
What git pull does is, given 2 branches, it creates a new commit that includes the branch we want to merge and put it in the head.
Since it automatically merges the branches it is considered to be a less safe solution when compared with the git fetch command.
How does it work?
Generally speaking, git pull can work in two different ways,
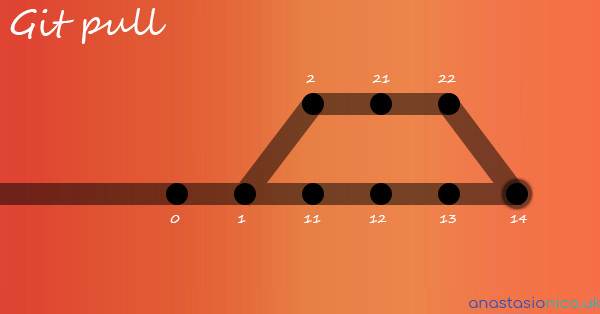
The first is a classic merge
Suppose we have 2 branches, the master and the feature one.
The branches have a few commits let’s say 0 - 1 - 11 - 12 - 13 the feature instead split on the commit 0 and has a couple of commits itself, let’s say the history is 0 - 2 - 21 - 22.
When we as Web developer run the git pull command on the master branch we are, fetching all the updates that are in the branch and creating a new commit that merge the commit 13 and the commit 22.
This will be commit 14.

The reason this is considered dangerous is that it all happens behind the scene, and we have no power to avoid the merging.
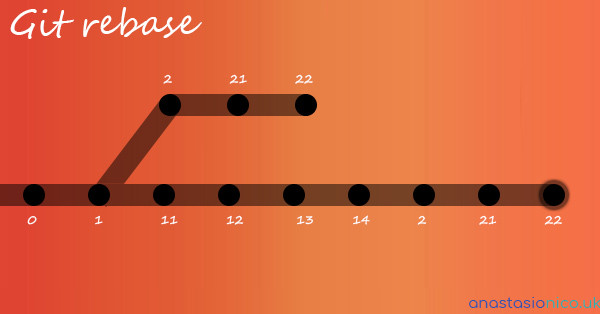
A better solution would be to rebase instead.
This time instead of merging the branch and the master commit in a single commit we push all the commits that are in the branch on top of the history of the master branch.

We can do this by using the command
git pull --rebase
This makes the history of the branch linear and avoids merges that might be useless if not problematic.
Little tip:
Git allows swapping the merging behaviour in favour of the rebase one with the command:
git config --global branch.autosetuprebase always
In this way the command pull will do git fetch & git pull --rebase instead of git fetch & git pull.
For more info about the command git pull check the official documentation out.
Git push
Here is another command that belongs to the category ‘GIT syncing process’.
This command is the exact opposite of git fetch and git pull,
If fact, while the two commands that we have just seen download the commits from the remote to our local, git push upload our updates into the remote we have set using the git remote command.
This is a very basic command but there are a few cases in which this may become a source of trouble.
For instance,
if the history of the remote differs for the history of our local then, is not possible to push our content anymore.
What we have to do in this case is to pull the remote and merge it with our local updates.
Once we are sure that there won’t be any conflicts we can then push again.
However,
you can avoid that by forcing it and making the remote repository match our local code
To do so use the command
git push --force
Forcing the push is not a common nor good practice.
GIT prevents you from overwriting the central repository’s history by refusing push requests when they result in a non-fast-forward merge.
Another use of the git push command is when we do some housekeeping.
Usually, the workflow of a task in your project is:
- Get the task
- Branch out from master or a release branch
- Do some work in the brand new branch
- Pr or merge directly to the main branch again
Eventually, we are going to end up with a lot of branches.
In both our local and the remote.
A way to remove all these older branches is to push them after they have been deleted.
git branch -D ScientificCalculatore
git push origin:ScientificCalculatore
The command above delete the branch from the remote repo
Git remote
Another fundamental command of git is the remote command.
This is another component of the system and like the other command that we have seen in this article, it is also responsible for sync the change on a given repo.
This command is used alongside several of the other commands that we have already described in this series, mainly git fetch and git push.
What does git remote do?
The git remote command allows us to CRUD connections to other repositories,
little help regarding git remote from Tower
You can consider this command as an interface that manages a list of remotes that are stored in your local config file.
The location of your file is: ./.git/config
The reason we need to set the remote is that otherwise we would pull upstream commits into our local repo or push our local commit to the central repository by specifying the URL of it, every time.
git remote exists to simplify our life and pass these URLs for us.
There are several methods you can use to access a remote repo.
The two main ones are via the HTTP protocol or via the SSH protocol.
HTTP is very straightforward,
it allows anonymous access to the repo, obviously with read-only permission.
In the case of SSH, if you want to access to the repo you will need an SSH account on your host machine, anyway, GIT carry authenticated access by default
The commands
There are different actions that you can perform with the git remote command
Add a remote
git remote add remoteName http://theproject.com/repo.git
The add command takes two parameters.
The first one is the name we want to give to the remote,
You can call it whatever you prefer, origin is the default.
The reason we need this is that this name will act as a shortcut for the URL that we will provide as the second parameter.
The second parameter, in fact, is the URL of the repository.
This must be specific for each repo.
You can also use several flags,
In my opinion, the most used is the -f one
git remote add -f remoteName http://theproject.com/repo.git
If the -f flag is used the repo will fetch remoteName straight away after the record is created
Delete a remote
Of course, as we can add a new remote we can also delete one
We can do that by using the rm command
git remote rm remoteName
Rename a remote
If you are familiar with the use of the Linux command line you won’t have any problem to remember this command.
git remote rename remoteNameOld remoteNameNew
What we do here is simply indicate the old name of the remote followed by the new name that needs to be used from now on.
List the remotes
There are several ways we can list the remotes and the use of one or another depends on the amount of the information you need to see.
The most basic command is
git remote
It will simply list the names of the remote already added,
You can also use the -v flag to see their URL
git remote -v
Eventually, we have the show command.
git remote show remoteName
This shows information about the single remote specified in the command, but it is the most detailed among them.
Prune remotes
This command works exactly the same way of the docker prune command that we have seen in the Docker series for PHP developer,
git remote prune remoteName
It deletes all the local branches of the name indicated that are not on the remote repository.
You can use this command in conjunction with a few flags.
One of the most common is:
git remote prune --dry-run name
This won’t prune any branches but it is useful because it lists all the branches that are set to be deleted.
Good practices while working with git remote
If you are working on a small team, it is often useful to connect straight to one of the other collaborator's repository rather than just working on the central repository.
If, for example, your colleague Tom is working on a new feature and need your help you can simply add is repo as a new remote (given that Tom repo is publicly available) and work on it directly.
Here is an example:
git remote add tom http://dev.theproject.com/tom.git
Now, you do not need to edit back and forth the central repo you can both work on tom repo and push to the main when the feature is ready.
If It's a good practice to work as little as possible on the master branch to avoid errors, the same is for the central repo of your project.
Pushing to remotes
Once you have set the remote you can push into it with the command we have seen in the previous sections of this article.
git push remoteName BranchName
Conclusion
When working with GIT all the work you do must be in sync with the other repo you have to work with.
This will avoid conflicts while pushing new code and most important make your and the life of your collaborators easier.
As I have written during the writing of this series GIT is a beast!
It is incredibly useful but it needs an absurd amount of work to be tamed.
I am not hiding the fact that I have learnt several new things while researching for this content.
This is not a programming language, but this too needs to be studied to be fully understood and used at its maximum.
Where do you go from now?
This article is part of a series Git for PHP developers if you missed the previous part you can start from the beginning with The basics of GIT.
If, instead you prefer to have a look at some article about your favourite language you can have a look at the basic of PHP here.

